
Mini
24. 11. 26. 개발일지 // 모니터링 구현, rss, heap, admin ui , namespace vs server 본문
개발일지
24. 11. 26. 개발일지 // 모니터링 구현, rss, heap, admin ui , namespace vs server
Mini_96 2024. 11. 27. 01:04* 모니터링 구현
- v1
- 단점 : 컨트롤러의 class, method만 추출 가능하다.
- v2
- 서비스 메소드 위에 @Trace를 달아주면 추적이 가능하다.

- v3
- Class 전체에 대해 걸어줄 수 있음.
- 내부 메소드 전체를 바꿔치기하는 방식
* redis에서 커넥션 풀
- 결론 : 커넥션풀이 큰 의미가없다.
- 어차피 큐에넣어서 명령어가 1개씩 처리되므로
Redis는 단일 커넥션으로도 여러 요청을 동시에 처리할 수 있습니다.
이것이 가능한 이유는:
- Redis가 내부적으로 요청을 파이프라이닝(pipelining)하여 처리
- ioredis가 커맨드 큐잉을 통해 요청을 관리
- Node.js의 이벤트 루프를 활용한 비동기 처리
예시 코드:
@Injectable()
export class RedisService {
  constructor(@InjectRedis() private readonly redis: Redis) {}

  async multipleRequests() {
    // 여러 클라이언트에서 동시에 아래 코드 실행
    const promises = [
      this.redis.set('key1', 'value1'),  // 요청 1
      this.redis.get('key2'),            // 요청 2
      this.redis.incr('counter'),        // 요청 3
      this.redis.hset('hash', 'f1', 'v1')// 요청 4
    ];

    // Redis는 이 요청들을 큐에 넣고 순차적으로 처리
    const results = await Promise.all(promises);
  }
}
내부 동작:
Client 1 ─┐
Client 2 ─┤         ┌─── Redis Command Queue ───┐
Client 3 ─┼─ conn ─┤ cmd1 → cmd2 → cmd3 → cmd4 ├─ Redis Server
Client 4 ─┤         └─────────────────────────┘
Client 5 ─┘
성능 모니터링:
@Injectable()
export class RedisMonitorService {
  constructor(@InjectRedis() private readonly redis: Redis) {}

  async getCommandStats() {
    // 현재 처리 중인 명령어 수
    const cmdstat = await this.redis.info('commandstats');

    // 클라이언트 큐 길이
    const queueLength = (this.redis as any).commandQueue?.length || 0;

    // 처리된 총 명령어 수
    const totalCommands = await this.redis.info('stats');

    return {
      queueLength,
      totalCommands,
      cmdstat
    };
  }
}
주의사항:
- 시간이 오래 걸리는 명령어는 전체 요청을 블로킹할 수 있음
- 매우 높은 동시성 상황에서는 커넥션 풀 고려
- 타임아웃 설정 필요
// 타임아웃 설정 예시
const redis = new Redis({
  host: 'localhost',
  port: 6379,
  commandTimeout: 5000, // 5초
  maxRetriesPerRequest: 3,
  retryStrategy: (times) => {
    return Math.min(times * 50, 2000);
  }
});
일반적인 사용 패턴:
@Injectable()
export class GameService {
  constructor(@InjectRedis() private readonly redis: Redis) {}

  async handleMultipleClients() {
    try {
      // 여러 클라이언트의 요청이 동시에 처리됨
      await this.redis
        .multi() // 트랜잭션 시작
        .set('game:1:state', 'active')
        .incr('game:1:players')
        .rpush('game:1:log', 'player joined')
        .exec(); // 트랜잭션 종료
    } catch (error) {
      // 에러 처리
    }
  }
}
대부분의 경우, 단일 커넥션으로 충분한 성능을 얻을 수 있습니다. 실제로 성능 병목이 발생하는지 모니터링하고 필요한 경우에만 커넥션 풀을 고려하시는 것이 좋습니다.
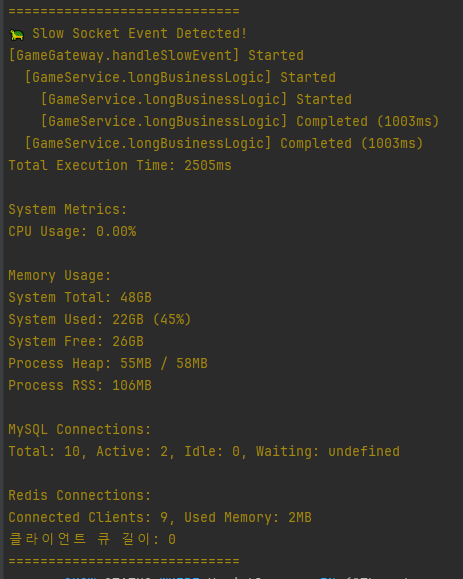
* 모니터링 구현 v4
- 병목시 원인을 찾기위해 cpu, mem ,mysql, redis의 상태를 알고자 함
- 이런 정보들을 제공하는 서비스 구현
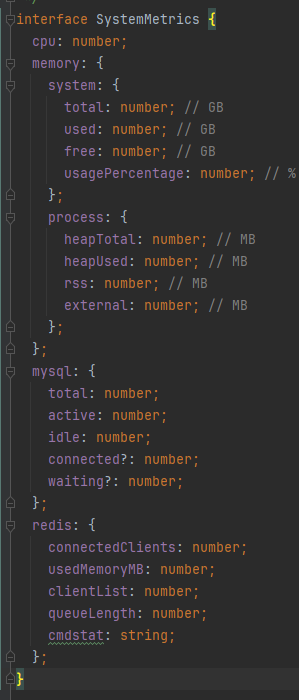
/**
* @class SystemMetricsService
* @description 시스템 메트릭 수집 서비스
*/
@Injectable()
export class SystemMetricsService {
constructor(
@InjectRedis() private readonly redis: Redis,
@InjectDataSource() private readonly dataSource: DataSource
) {}
async getMetrics(): Promise<SystemMetrics> {
const [cpuUsage, memoryUsage] = await Promise.all([this.getCpuUsage(), this.getMemoryUsage()]);
return {
cpu: cpuUsage,
memory: memoryUsage,
mysql: await this.getMySQLMetrics(),
redis: await this.getRedisMetrics()
};
}
private async getCpuUsage(): Promise<number> {
const cpus = require('os').cpus();
const cpuCount = cpus.length;
const loadAvg = require('os').loadavg();
return (loadAvg[0] / cpuCount) * 100;
}
private getMemoryUsage() {
const os = require('os');
// 시스템 전체 메모리
const totalMemory = os.totalmem();
const freeMemory = os.freemem();
const usedMemory = totalMemory - freeMemory;
// Node.js 프로세스 메모리
const processMemory = process.memoryUsage();
return {
system: {
total: Math.round(totalMemory / 1024 / 1024 / 1024), // GB
used: Math.round(usedMemory / 1024 / 1024 / 1024), // GB
free: Math.round(freeMemory / 1024 / 1024 / 1024), // GB
usagePercentage: Math.round((usedMemory / totalMemory) * 100)
},
process: {
heapTotal: Math.round(processMemory.heapTotal / 1024 / 1024), // MB
heapUsed: Math.round(processMemory.heapUsed / 1024 / 1024), // MB
rss: Math.round(processMemory.rss / 1024 / 1024), // MB
external: Math.round(processMemory.external / 1024 / 1024) // MB
}
};
}
private async getMySQLMetrics(): Promise<{
total: number;
active: number;
idle: number;
connected?: number;
waiting?: number;
}> {
try {
// TypeORM의 connection options에서 직접 가져오기
const connectionOptions = this.dataSource.options;
const poolSize = (connectionOptions as any).extra?.connectionLimit || 10; // 기본값
// 현재 연결 상태
const queryRunner = this.dataSource.createQueryRunner();
const result = await queryRunner.query(
'SHOW STATUS WHERE Variable_name IN ("Threads_connected", "Threads_running", "Threads_cached")'
);
await queryRunner.release();
const metrics = result.reduce((acc, row) => {
acc[row.Variable_name] = parseInt(row.Value);
return acc;
}, {});
return {
total: poolSize,
active: metrics.Threads_running || 0,
idle: metrics.Threads_cached || 0,
connected: metrics.Threads_connected || 0
};
} catch (error) {
return {
total: 0,
active: 0,
idle: 0,
waiting: 0
};
}
}
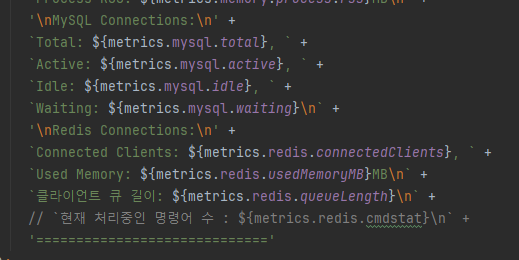
private async getRedisMetrics() {
const info = await this.redis.info();
const clientList = await this.redis.client('LIST');
// Redis INFO 명령어 결과 파싱
const connected_clients = parseInt(info.match(/connected_clients:(\d+)/)?.[1] || '0');
const used_memory = parseInt(info.match(/used_memory:(\d+)/)?.[1] || '0');
const { queueLength, cmdstat, totalCommands } = await this.getCommandStats();
return {
connectedClients: connected_clients,
usedMemoryMB: Math.round(used_memory / 1024 / 1024),
clientList: String(clientList).split('\n').length,
queueLength,
cmdstat
};
}
private async getCommandStats() {
// 현재 처리 중인 명령어 수
const cmdstat = await this.redis.info('commandstats');
// 클라이언트 큐 길이
const queueLength = (this.redis as any).commandQueue?.length || 0;
// 처리된 총 명령어 수
const totalCommands = await this.redis.info('stats');
return {
queueLength,
totalCommands,
cmdstat
};
}
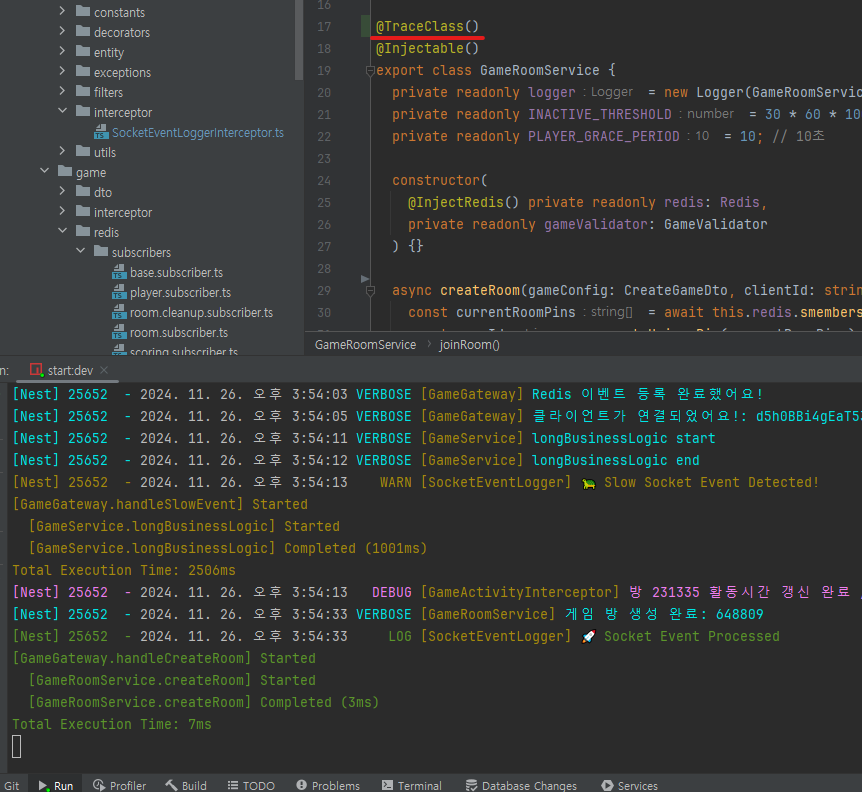
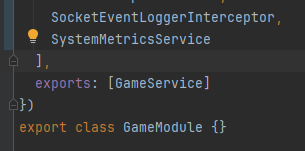
}- 인터셉터에서 해당 서비스를 사용하고, 슬로우쿼리나 에러 발생시 찍어준다.
- 인터셉터를 사용하는 게임모듈에서 provider에 추가해줘야함
- 이래야 bean에 등록되는듯?
* process heap, rss?
Node.js의 메모리 지표를 설명드리겠습니다:
- Heap Memory (힙 메모리):
heapTotal: JavaScript 객체를 저장하기 위해 할당된 메모리의 총량heapUsed: 실제로 사용 중인 힙 메모리의 양- JavaScript 객체, 문자열, 클로저 등이 저장되는 공간
// 예시: const array = new Array(1000000); // heap 메모리 사용 const objects = Array.from({length: 10000}, () => ({foo: 'bar'})); // 더 많은 heap 사용
- RSS (Resident Set Size):
- 프로세스가 사용하는 실제 물리 메모리의 총량
- Heap + Stack + Code Segment 등 모든 메모리를 포함
- V8 엔진 자체의 메모리도 포함
// 메모리 사용량 모니터링 예시 setInterval(() => { const memory = process.memoryUsage(); console.log(` RSS: ${memory.rss / 1024 / 1024} MB Heap: ${memory.heapUsed / 1024 / 1024} / ${memory.heapTotal / 1024 / 1024} MB `); }, 1000);
- External:
- C++ 객체가 사용하는 메모리 (V8 엔진 외부)
- Buffer 객체 등이 여기에 포함
// 예시: const buffer = Buffer.alloc(1024 * 1024); // 1MB external 메모리 사용
메모리 모니터링 예시:
/**
 * @class MemoryMonitor
 * @description 상세한 메모리 모니터링
 */
@Injectable()
export class MemoryMonitor {
  private readonly logger = new Logger(MemoryMonitor.name);

  getDetailedMemoryUsage() {
    const memory = process.memoryUsage();

    // Heap 사용률 계산
    const heapUsagePercentage = (memory.heapUsed / memory.heapTotal) * 100;

    return {
      heap: {
        total: this.toMB(memory.heapTotal),
        used: this.toMB(memory.heapUsed),
        usage: Math.round(heapUsagePercentage),
        available: this.toMB(memory.heapTotal - memory.heapUsed)
      },
      rss: {
        total: this.toMB(memory.rss),
        heapPercentage: Math.round((memory.heapTotal / memory.rss) * 100)
      },
      external: this.toMB(memory.external)
    };
  }

  // 메모리 누수 감지
  startMemoryLeakDetection(threshold = 90) {
    setInterval(() => {
      const usage = this.getDetailedMemoryUsage();

      if (usage.heap.usage > threshold) {
        this.logger.warn(`
          Possible memory leak detected!
          Heap Usage: ${usage.heap.usage}%
          Used: ${usage.heap.used}MB
          Total: ${usage.heap.total}MB
          RSS: ${usage.rss.total}MB
        `);
      }
    }, 30000); // 30초마다 체크
  }

  private toMB(bytes: number): number {
    return Math.round(bytes / 1024 / 1024);
  }
}
메모리 문제 디버깅시 체크포인트:
- Heap 사용률이 지속적으로 증가하는지
- RSS가 비정상적으로 높은지
- External 메모리 사용량이 예상과 다른지
@Injectable()
export class AppService implements OnModuleInit {
  constructor(private memoryMonitor: MemoryMonitor) {}

  onModuleInit() {
    // 메모리 사용량이 90%를 넘으면 경고
    this.memoryMonitor.startMemoryLeakDetection(90);

    setInterval(() => {
      const usage = this.memoryMonitor.getDetailedMemoryUsage();
      console.log(`
        Memory Usage:
        - Heap: ${usage.heap.used}MB / ${usage.heap.total}MB (${usage.heap.usage}%)
        - RSS: ${usage.rss.total}MB (Heap is ${usage.rss.heapPercentage}% of RSS)
        - External: ${usage.external}MB
      `);
    }, 60000); // 1분마다 로깅
  }
}
출력 예시:
Memory Usage:
- Heap: 65MB / 94MB (69%)
  ├─ Used: 65MB
  └─ Available: 29MB
- RSS: 128MB
  └─ Heap is 73% of RSS
- External: 12MB
이러한 메모리 지표들을 모니터링하면:
- 메모리 누수 감지
- 성능 최적화 포인트 발견
- 리소스 사용량 예측
- 스케일링 계획 수립
에 도움이 됩니다.
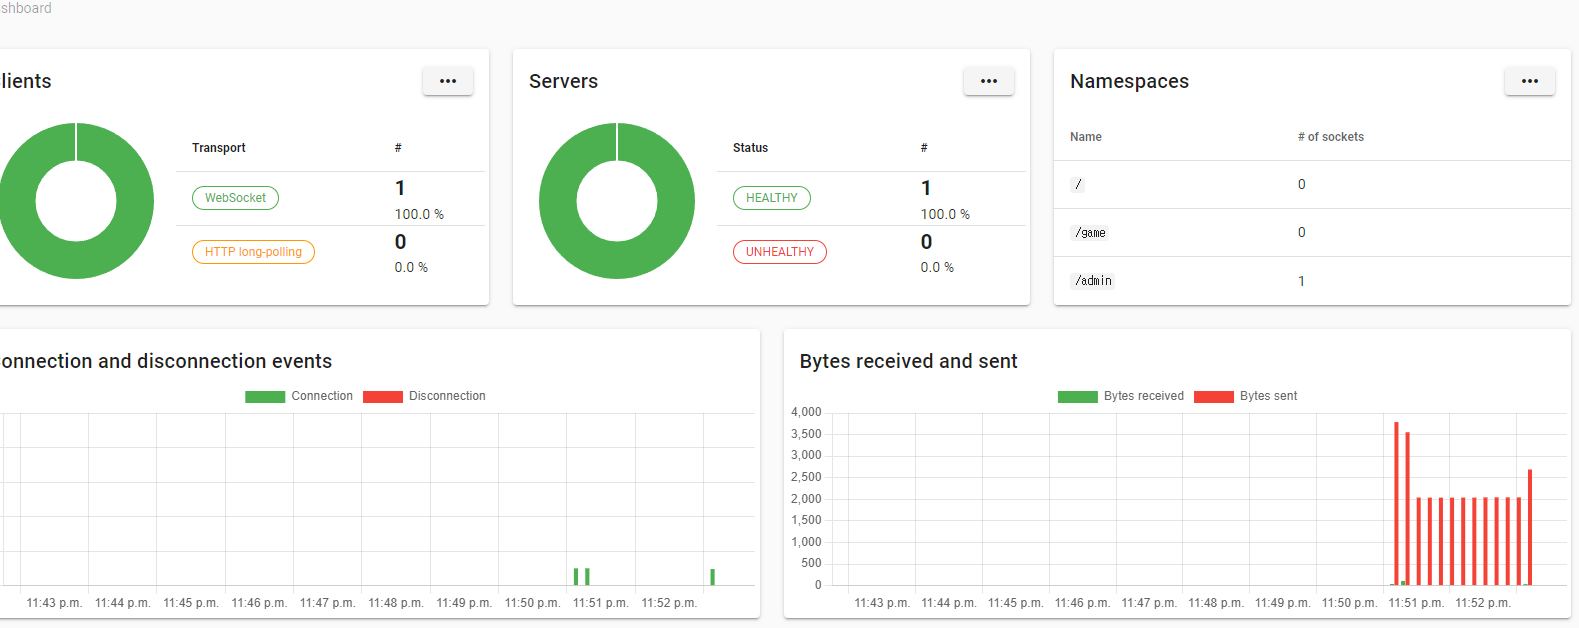
* admin ui 연결
- io.of is not a function 오류 해결


* namespace vs server
- namespace vs server
Namespace와 Server의 차이점과 관계를 설명드리겠습니다:
- Server (io)
// 메인 Socket.IO 서버 인스턴스 const io = new Server(3000);
- 전체 Socket.IO 서버를 관리
- 모든 namespace를 포함
- HTTP 서버와의 연결을 처리
- 전역 설정 관리
- Namespace (io.of('/something'))
// namespace 생성 const chatNamespace = io.of('/chat'); const gameNamespace = io.of('/game');
- Server의 하위 개념
- 특정 엔드포인트에 대한 독립된 통신 채널
- 각각의 namespace는 자신만의 이벤트, 룸, 미들웨어를 가짐
- Server 인스턴스에 대한 참조를 .server 프로퍼티로 가짐
관계도:
Server (io)
├── Default Namespace (/)
├── Chat Namespace (/chat)
│ └── server (참조)
├── Game Namespace (/game)
│ └── server (참조)
└── Admin Namespace (/admin)
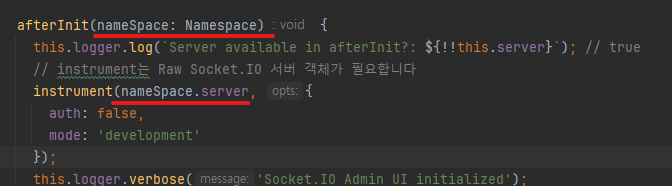
└── server (참조)그래서 이 코드가 작동하는 이유는:
afterInit(nameSpace: Namespace) {
    instrument(nameSpace.server, {
      auth: false,
      mode: 'development'
    });
}- NestJS가 Gateway에 namespace를 주입할 때, 이 namespace는 이미 Server 인스턴스에 연결된 상태
- nameSpace.server를 통해 상위 Server 인스턴스에 접근 가능
- instrument 함수는 Server 인스턴스가 필요한데, nameSpace.server가 바로 그것을 제공
더 자세한 예시:
@WebSocketGateway({ namespace: '/game' })
export class GameGateway implements OnGatewayInit {
  @WebSocketServer()
  namespace: Namespace;  // 게임 네임스페이스

  afterInit(namespace: Namespace) {
    // namespace와 this.namespace는 동일
    console.log(namespace === this.namespace);  // true

    // 상위 Server 인스턴스 접근
    const io = namespace.server;

    // Admin UI 설정
    instrument(io, {
      auth: false,
      mode: 'development'
    });

    // 네임스페이스별 설정 가능
    namespace.use((socket, next) => {
      // 게임 네임스페이스만의 미들웨어
      next();
    });

    // 서버 전체 설정
    io.use((socket, next) => {
      // 모든 네임스페이스에 적용되는 미들웨어
      next();
    });
  }
}
네임스페이스의 주요 사용 사례:
- 기능별 분리
// 채팅 기능 @WebSocketGateway({ namespace: '/chat' }) export class ChatGateway {}
// 게임 기능
@WebSocketGateway({ namespace: '/game' })
export class GameGateway {}
// 알림 기능
@WebSocketGateway({ namespace: '/notification' })
export class NotificationGateway {}
2. 접근 제어
```typescript
@WebSocketGateway({ namespace: '/admin' })
export class AdminGateway implements OnGatewayInit {
  afterInit(namespace: Namespace) {
    namespace.use((socket, next) => {
      // admin 네임스페이스만의 인증 로직
      if (isAdmin(socket)) {
        next();
      } else {
        next(new Error('Admin only'));
      }
    });
  }
}- 이벤트 격리
// 채팅 네임스페이스의 이벤트 chatNamespace.on('message', () => {});
// 게임 네임스페이스의 동일한 이름의 이벤트
gameNamespace.on('message', () => {});
```
* 비동기에서 어떻게 로깅이 가능한가?
AsyncLocalStorage를 사용한 비동기 컨텍스트 추적 방식을 자세히 설명드리겠습니다:
/**
 * @class TraceContext
 * @description 실행 컨텍스트를 추적하기 위한 클래스
 */
class TraceContext {
  private depth = 0;          // 실행 깊이
  private logs: string[] = []; // 로그 저장소

  increaseDepth() {
    this.depth++;
  }

  decreaseDepth() {
    this.depth--;
  }

  addLog(message: string) {
    const indent = '  '.repeat(this.depth); // 깊이에 따른 들여쓰기
    this.logs.push(`${indent}${message}`);
  }

  getLogs(): string[] {
    return this.logs;
  }
}

/**
 * @class TraceStore
 * @description AsyncLocalStorage를 사용한 추적 저장소
 */
export class TraceStore {
  private static instance = new AsyncLocalStorage<TraceContext>();

  static getStore() {
    return this.instance;
  }
}
사용 예시:
// 인터셉터에서:
return new Observable((subscriber) => {
// 새로운 TraceContext 생성
const traceContext = new TraceContext();
// AsyncLocalStorage에 컨텍스트 설정 및 실행
TraceStore.getStore().run(traceContext, async () => {
try {
// 1. 최상위 로그 추가
traceContext.addLog(`[${className}.${methodName}] Started`);
// 2. 실제 핸들러 실행 (여기서 다른 서비스 메서드들이 호출될 수 있음)
const result = await firstValueFrom(next.handle());
// 3. 모든 하위 호출이 완료된 후 로그 수집
const logs = traceContext.getLogs();
// ... 로깅 ...
} catch (error) {
// 에러 발생시에도 전체 로그 스택 확인 가능
const logs = traceContext.getLogs();
// ... 에러 로깅 ...
}
});
});
// 서비스 메서드에서:
@Trace()
async someServiceMethod() {
// TraceStore에서 현재 실행 중인 컨텍스트 가져오기
const traceContext = TraceStore.getStore().getStore();
if (traceContext) {
traceContext.increaseDepth(); // 깊이 증가
traceContext.addLog('Service method started'); // 로그 추가
// 비즈니스 로직 실행
await this.doSomething();
traceContext.decreaseDepth(); // 깊이 감소
}
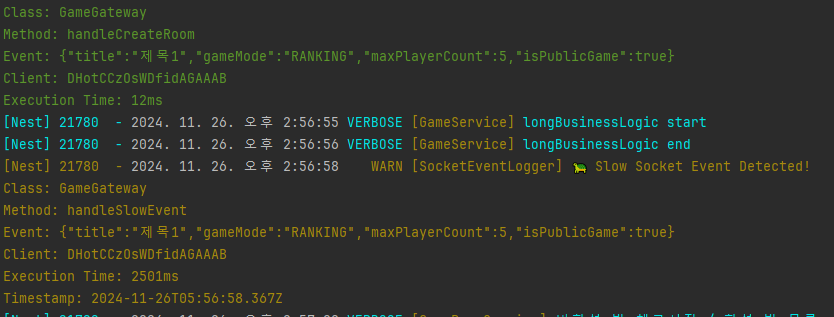
}실행 예시:
// 컨트롤러/게이트웨이
@SubscribeMessage('createRoom')
async handleCreateRoom() {
  await this.gameService.createRoom();  // 서비스 메서드 호출
}

// 서비스
@Trace()
async createRoom() {
  await this.validateRoom();  // 다른 메서드 호출
  await this.saveRoom();      // 다른 메서드 호출
}

// 출력 로그:
[GameGateway.handleCreateRoom] Started
  [GameService.createRoom] Started
    [GameService.validateRoom] Started
    [GameService.validateRoom] Completed (5ms)
    [GameService.saveRoom] Started
    [GameService.saveRoom] Completed (10ms)
  [GameService.createRoom] Completed (15ms)
Total Execution Time: 20ms
주요 특징:
- 비동기 컨텍스트 유지
- AsyncLocalStorage가 비동기 호출 체인에서도 컨텍스트 유지
- Promise, async/await 사이에서도 동일한 컨텍스트 접근 가능
- 실행 깊이 추적
traceContext.increaseDepth(); // 깊이 증가 try { // 메서드 실행 } finally { traceContext.decreaseDepth(); // 깊이 감소 }- 계층적 로깅
[Gateway.method] Started [Service.method1] Started [Service.method2] Started [Service.method2] Completed [Service.method1] Completed
이러한 방식으로:
- 전체 실행 흐름 추적 가능
- 메서드 호출 깊이 확인 가능
- 비동기 작업에서도 컨텍스트 유지
- 에러 발생 지점까지의 전체 실행 경로 파악 가능
* 웹소켓의 연결과정
- 폴링 vs 롱폴링
일반 폴링 (Polling)
// 클라이언트
function polling() {
  setInterval(async () => {
    const response = await fetch('/api/messages');
    const messages = await response.json();
    // 새 메시지 처리
  }, 5000); // 5초마다 요청
}- 클라이언트가 주기적으로 서버에 요청
- 데이터 유무와 관계없이 계속 요청
- 불필요한 요청이 많음
롱폴링 (Long Polling)
// 클라이언트
async function longPolling() {
  try {
    const response = await fetch('/api/messages/wait');
    const messages = await response.json();
    // 메시지 처리
    longPolling(); // 새로운 요청 시작
  } catch (error) {
    setTimeout(longPolling, 1000); // 에러시 재시도
  }
}

// 서버 (NestJS)
@Controller('api/messages')
export class MessageController {
  @Get('wait')
  async waitForMessages() {
    return new Promise(resolve => {
      // 새 메시지가 있을 때까지 대기
      this.messageService.onNewMessage(messages => {
        resolve(messages);
      });
    });
  }
}- 클라이언트가 요청을 보내고 서버가 데이터가 있을 때까지 응답을 대기
- 불필요한 요청이 줄어듦
- 서버 리소스는 더 많이 사용
- WebSocket 연결 과정
1. Handshake (HTTP Upgrade)
   Client → Server: HTTP Upgrade 요청
   Server → Client: HTTP 101 Switching Protocols

2. WebSocket Protocol
   양방향 통신 시작

3. Polling Fallback (필요시)
   WebSocket 실패시 polling으로 전환
코드로 보는 연결 과정:
/**
 * @class WebSocketConnection
 * @description WebSocket 연결 과정 설명
 */
@WebSocketGateway()
export class GameGateway implements OnGatewayConnection {
  @WebSocketServer()
  server: Server;

  handleConnection(client: Socket, ...args: any[]) {
    // 1. Handshake 정보 확인
    const handshake = client.handshake;
    console.log('Transport used:', handshake.headers.upgrade ? 'WebSocket' : 'Polling');
    console.log('Query parameters:', handshake.query);
    console.log('Auth token:', handshake.auth);

    // 2. 초기 설정
    client.emit('connected', { id: client.id });

    // 3. 에러 처리
    client.on('error', (error) => {
      console.error('Socket error:', error);
    });

    // 4. 연결 상태 모니터링
    client.conn.on('packet', (packet) => {
      const isHeartbeat = packet.type === 'ping' || packet.type === 'pong';
      if (!isHeartbeat) {
        console.log('Received packet:', packet.type);
      }
    });
  }
}
클라이언트 측:
const socket = io('http://localhost:3000', {
  transports: ['websocket', 'polling'], // 전송 방식 우선순위
  reconnection: true,                   // 재연결 활성화
  reconnectionAttempts: 5,             // 최대 재시도 횟수
  reconnectionDelay: 1000,             // 재연결 대기시간
  timeout: 10000,                      // 연결 타임아웃
});

// 연결 상태 모니터링
socket.on('connect', () => {
  console.log('Connected with ID:', socket.id);
  console.log('Transport:', socket.io.engine.transport.name);
});

// Transport 변경 감지
socket.io.engine.on('transportChange', (transport) => {
  console.log('Transport changed to:', transport.name);
});

// 재연결 시도 모니터링
socket.io.on('reconnect_attempt', (attempt) => {
  console.log(`Reconnection attempt ${attempt}`);
});
자세한 연결 과정:
1. HTTP Upgrade 요청
GET /socket.io/?EIO=4&transport=websocket HTTP/1.1
Host: localhost:3000
Upgrade: websocket
Connection: Upgrade
Sec-WebSocket-Key: dGhlIHNhbXBsZSBub25jZQ==
Sec-WebSocket-Version: 13

2. 서버 응답
HTTP/1.1 101 Switching Protocols
Upgrade: websocket
Connection: Upgrade
Sec-WebSocket-Accept: s3pPLMBiTxaQ9kYGzzhZRbK+xOo=

3. WebSocket 연결 수립
-> 양방향 통신 시작
연결 과정에서 중요한 점:
- Transport Upgrade:
@WebSocketGateway({ transports: ['websocket', 'polling'], allowUpgrades: true, upgradeTimeout: 10000 })- Fallback 처리:
const socket = io('http://localhost:3000', { transports: ['websocket'], fallback: { polling: true, timeout: 5000 } });- 보안:
@WebSocketGateway({ cors: { origin: process.env.ALLOWED_ORIGINS, credentials: true } })- Health Check:
@Injectable()
export class SocketHealthService {
checkConnection(socket: Socket) {
 return new Promise((resolve, reject) => {
   socket.emit('ping');

   const timeout = setTimeout(() => {
     reject(new Error('Health check timeout'));
   }, 5000);

   socket.once('pong', () => {
     clearTimeout(timeout);
     resolve(true);
   });
 });
}
}
각 방식의 장단점:
- Polling
- 장점: 구현 간단, 방화벽 문제 없음
- 단점: 서버 부하 큼, 실시간성 떨어짐
- Long Polling
- 장점: 실시간성 향상, 불필요한 요청 감소
- 단점: 서버 리소스 사용 많음, 연결 관리 복잡
- WebSocket
- 장점: 진정한 실시간, 효율적 리소스 사용
- 단점: 방화벽 이슈, 연결 관리 필요
'개발일지' 카테고리의 다른 글
| 24. 12. 3. 개발일지 // 성능개선 (0) | 2024.12.27 |
|---|---|
| 24. 11. 27. 개발일지 // jest --runInBand --detectOpenHandles --forceExit 오류 해결, socket io handshake error (0) | 2024.11.28 |
| 24. 11 . 25. 개발일지 // 강퇴구현, 핀포인트 도입 (0) | 2024.11.26 |
| 24. 11. 21. 개발일지 // 자동배포 수정, 인터셉터 버그수정(redis event trigger 이해) (0) | 2024.11.22 |
| 24. 11. 20. 개발일지 // redis 메모리 관리 (0) | 2024.11.21 |
'개발일지' Related Articles
more


